The Time Has Come...

I have been contemplating writing this post for a while now, and I can't put it off any longer. I have been blogging for a long time, si...

Tuesday, August 20, 2013

Guest Post by Samarium's Swatches: Neon Watermarble

Hi folks! I'm almost recuperated enough to start swatching again but I do have another awesome guest post for you today, this time from Sarah of Samarium's Swatches. This gal is so fab, her photos and manicure skills make me envious! I also just love her blog style, delightful and so fun. I'm happy to show you her awesome nail art post here and be sure to check her out so you can keep up with all her awesome manicures!
-------------------------------------------------------------------------------------------

Hey guys! My name is Sarah from Samarium's Swatches!
Kellie asked me to help her out with a guest post and I gladly obliged after a few failed attempts! haha

For today's post I just knew I wanted to do something neon and bright!

First I started off with a white base, using Zoya Purity.
Using a wedge makeup sponge and the gradient sponging technique I used the following colors,
in the following order. 
For those unfamiliar you paint each color onto the sponge in a strip and then stamp the sponge on each nail. Then repaint and repeat once more onto your nails. I'd recommend using less colors though!

Illamasqua - Poke
China Glaze - Shocking Pink
Illamasqua - Gamma
Illamasqua - Rare
Illamasqua - Nurture
Illamasqua - Nomad
Illamasqua - Serenity

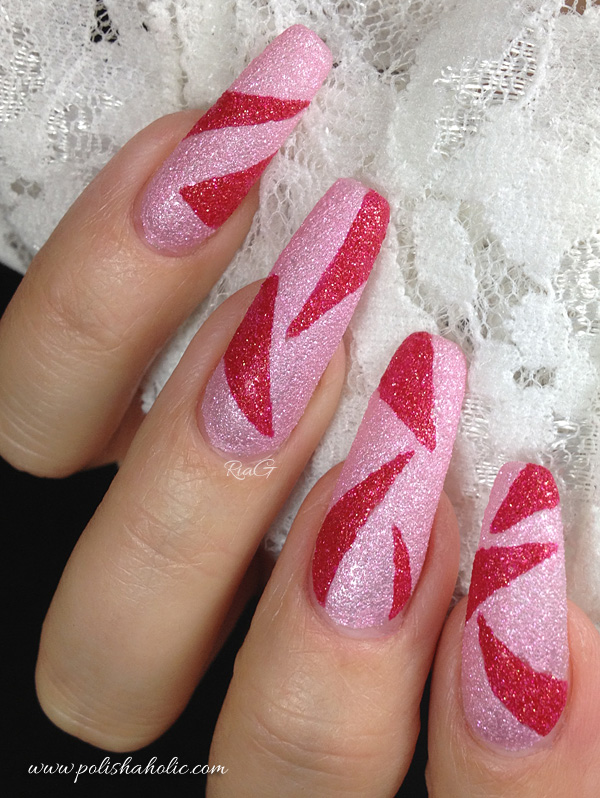
Then I mattified it with Butter London Matte Finish!

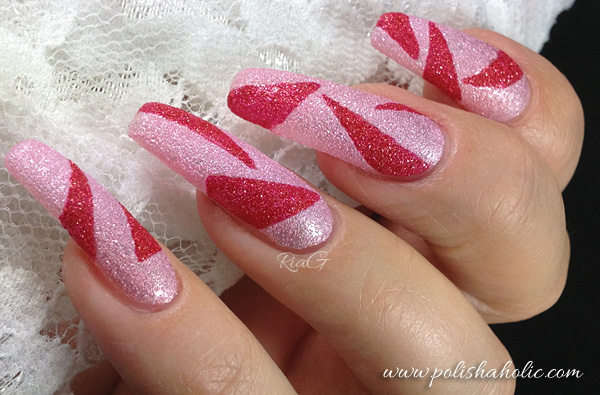
Then using A England Camelot, Glitter Gal Turbulence and Orly Nailtrition I tried a water marble.

I've been trying to practice at water marbling once a week lately, and I actually have improved some!
I'm not great at it but I really love how this turned out! Especially the pinky!

What do you guys think? I hope you like it!


Where to find Samarium's Swatches

Friday, August 16, 2013

Guest Post by Tales About Nails: Pyjama Dotticure

Howdy there :) Today's guest post comes from a gal all the way in Australia! I know there is a huge Australian beauty blogger base, the nail bloggers even have a group they call the Gumleaf Mafia (so cute). I first noticed Lauren's awesome nails on Instagram and found she had a blog as well called Tales About Nails. Her lovely and beautifully symmetrical nails caught my eye and I hope they catch yours as well. Be sure to follow her to check out all her great nail art designs and color reviews! Thanks Lauren!

-------------------------------------------------------------------------------------------

Hey there everyone! I'm Lauren from Tales About Nails, or you may know me as @xxlovelauren on Instagram. Kellie's awesome blog was one of the very first nail blogs I started reading back when I didn't know a holographic from a shimmer or a creme from a jelly, and I never imagined I'd be on here one day! It's such an honour!

This dotticure was inspired by a pair of pyjama shorts I spotted (ha! pun intended) in a store the other day and I just loved the colour scheme. I even stood there in the store for a while thinking up the polishes that would match up with the colours haha. Dotticures are a great form of nail art for even the most beginner person. I used a small dotting tool from a nail art tool set but toothpicks or bobbypins work just fine!

Polishes used: Sinful Colors 'Cool Gray' for the base, and Sally Hansen 'Pacific Blue', China Glaze 'Flip Flop Fantasy', Ulta3 'Lily White' and Lime Crime 'Once In A Blue Mousse' for the dots.

Hope you guys like it!

Thank you so much for the opportunity to guest post for you Kellie! xx

Where to find Tales About Nails

Wednesday, August 14, 2013

Guest Post by ChrissyAi: "Turtle Shell" Nail Art + Tutorial

What's up kids? I'm so stoked today to show you a guest post by one of my favorite makeup and nail bloggers, Christa of ChrissyAi! I was so impressed when I found this gal's blog, her nails are flawless and her makeup looks are fierce. Be sure to check out her Snorting Sprinkles series, they're so fun! She's created a beautiful nail art look for my awesome readers (you!) and has even included a video tutorial! Thank you Christa :D

-------------------------------------------------------------------------------------------

Hello lovely readers of KellieGonzo.com!
First off I'd like to thank Kellie for giving me the chance to guest post on her awesome blog, I've been a reader for a pretty long time and I adore her swatches. ♥

My mani for this guest post is a little weird since it's kind of an inside joke with a friend of mine that I decided to turn into nail art! I made a 'turtle shell' design (which to some people may not look like a turtle shell, hence the quotations haha). It's meant to resemble more of a cartoon turtle shell rather than an actual turtle shell.

Hopefully some of you see it.. or else I just look crazy!


And that's it!
I hope you enjoyed this simple silly manicure and that you try it out. You could always use different colors and ditch the 'turtle' theme!
 photo PostSignature.png

Where to find ChrissyAi

Monday, August 12, 2013

Guest Post by Nail Polish Wars: Sunsational Syrup Skittles

Happy Monday friends! I am lucky to have another fab guest post to show you today. Nicole writes the blog Nail Polish Wars that shows off her great photography and beautiful nails. She also has an awesome indie nail polish brand called Elixir Lacquers, some of which I've shown you in previous posts. She is a great businesswoman and a wonderful blogger. Be sure to follow her to check out what she's got coming up! Thank you Nicole!

-------------------------------------------------------------------------------------------

Hi everyone! I'm Nicole from Nail Polish Wars,and I'm so excited to be hanging out over here in Kellie Gonzo's corner of the polish world!! I thought I'd do a Sunsational Syrup Skittle mani for you!


I started off with three coats of the cremes from the China Glaze Sunsational Collection. From thumb to pinky, I used Sun of a Peach, You Drive Me Coconuts, Too Yacht to Handle, Neon & On & On, and That's Shore Bright. I followed with one coat of SV.


I then used complimenting jellies from the same Sunsational Collection for the syrup gradients. I did this by applying one thin coat just below the cuticle line, a second thin coat a bit lower, and a third thin coat a bit lower than that. From thumb to pinky: Shell-o, Are You Jelly?, Keepin' It Teal, Heat Index, and Isle See You Later. I followed with another coat of SV.


To add a little pizzazz, I applied one coat of Elevation Polish Haba Xueshan, followed by one final coat of SV.


While it may seem that may have been a ridiculous amount of polish layers, it really isn't! All of the coats applied are very thin, so you won't have to worry about thickness or extended drying times.


I absolutely love the end result! I can't wait to try mixing and matching colors for this technique!!


I saw this gradient method used on Rebecca Likes Nails earlier this summer, I knew I had to try it!!


I really hope you enjoyed my guest post! I had so much fun creating it for you all!!

Happy Painting!


Where to find Nail Polish Wars

Friday, August 9, 2013

Guest Post by MakeupWithdrawal: Papaya Punch & Bang

Today's guest post is from the awesome Mimi of MakeupWithdrawal, a gal that I have long admired for her elegant nails and on point nail art. She is a fabulous blogger and I'm really happy to show one of her beautiful manicures on my blog. Be sure to follow her to keep up with her posts! Thanks Mimi :)

-------------------------------------------------------------------------------------------


Hello! I'm Mimi from MakeupWithdrawal, a blog that features both makeup and nails. KellieGonzo is one of the blogs that I've been following for the longest, I was so honored and thrilled when Kellie asked me to write a guest post! Today I'll be showing you a recent manicure of mine.


I started out with a base coat of Le Chat Undercover and then a base color of China Glaze Papaya Punch, so that if there were any gaps in the glitter it hopefully wouldn't be too obvious. It's one of my favorite colors but always seems to be a little patchy during application for me, no matter the amount of thinner I add.


I used two coats of Salon Perfect Bang, which dried a bit gritty so I used one coat of Nail Pattern Boldness Glitter Food. I free handed some white accents (Chrome Girl Nails Between The Sheets) with a thin stripper brush and topped it off with some shiny Seche Vite.


Thank you so much for checking out my manicure. And thank you Kellie for having me be a guest blogger!

Where to find MakeupWithdrawal

Wednesday, August 7, 2013

Guest Post by RiaG Polishaholic: OPI Liquid Sand Nail Art

Hi there folks! If you didn't hear, my swatching hand is out of commission right now so I am having some of my lovely blogger friends guest post for a while. Today's post is from RiaG from the Polishaholic blog. Her blog name is close to my other gal pal Jen of The PolishAholic, but she is a separate entity so don't get confused. She hails from Finland and has gorgeous long, luxe nails. I'm mega jealous, I wish I had her beautiful nails! She put together a beautiful nail art post for your entertainment. Thanks Ria! Enjoy :)
-------------------------------------------------------------------------------------------

Hello everyone! I'm RiaG and I'm so honored to be doing this guest post for you today. Since I've mostly done swatches lately I decided to take this opportunity to do some nail art with OPI Liquid Sand polishes. I used OPI Pussy Galore, Magazine Cover Mouse and some blue masking tape to create this manicure.

I started off by cutting some pieces of blue masking tape and placing those on my nails. I made sure the tape was attached to the nail well enough and there was no wrinkles. I have a thin UV-gel layover on my own nails to protect them so I don't need to use a base coat. On natural nails you should always use base coat and allow it to dry completely before the taping part.

Next I applied two coats of OPI Pussy Galore and immediately removed the tapes. You have to be fast with removing the tapes or the lines won't look crisp. A pair of tweezers can be helpful. After I had all the tape pieces removed I allowed the polish to dry for a while.

Now the first part of this manicure was dry and I had naked parts on my nails where I removed the tapes from. So I took a small nail art brush, dropped some OPI Magazine Cover Mouse on a piece of foil and started carefully filling those naked spots. You need a steady hand and a fine brush to do this part :) I took a new, fresh drop of polish and cleaned the brush with acetone for each nail. After all the naked areas had been covered I let the manicure dry and I was done.

Very easy, quite quick and I really like how it turned out. When I first saw swatch photos of these textured polishes like OPI Liquid Sands I was feeling a bit meh about them. Then I decided to give one a try and I was hooked. I love how they look alone and they are also great for a lot of different nail art designs.

I had fun writing this guest post for you today and I hope you enjoyed it! Thank you for reading :)

Love,
RiaG

Where to find RiaG Polishaholic

Monday, August 5, 2013

Guest Post by ChitChat Nails: Neon Glitter Tips

Hi everyone, I have unfortunately sustained a small injury on my swatching hand :( I will be fine of course, but can't swatch for the time being. A few of my talented blog friends have agreed to help me out for a while with guest posts, yay! Today's post is from Marta of ChitChat Nails. She is a beautiful and super sweet chick who has awesome nails and a great blog. She does amazing nail art too, which is something I've never been able to get the hang of. Thanks to Marta for agreeing to help and I hope if you aren't already that you will follow her fabulous blog!

-------------------------------------------------------------------------------------------

Hello Lovely Ladies,

My name is Marta and I run a Canadian nail-art blog called ChitChat Nails. Let me start by asking you this: "don't you ever wish that you could remember some of the earliest events from when you were a baby? The first moments, your first influences?"... well, I sure remember my first influences when I was a "blogging baby" 2.5 years ago- and Kellie was a MAJOR one of them! Still wet behind the ears, new to manicure cleanup, proper lighting etc, Kellie's blog was like a magical world of perfection to me! I would literally sit in awe and amazement at her swatches. When Kellie started following me on Twitter I nearly passed out with excitement, and her request for me to put together a guest post (I will unabashedly admit) made me squeal with delight!
Long story short, I am beyond words honored to be here. Two and a half years into blogging I still have many things to learn, but I hope you will like today's post :D

I created a fun and bright funky-french look. I started out by sponging KBShimmer Pink Twice on the tips of my nails. I then added Cirque Electric Circus and Lush Lacquer Clowning Around to the tips. Finally I added the OPI Matte topcoat :D I hope you like my take on a neon-bright funky-french manicure.

Do you reach for neons in the summer time?
THANK YOU FOR READING!

Where to find ChitChat Nails

Friday, August 2, 2013

Lac Attack - Puddle Jumping & Bunny Poop

Hi everyone! I hope everyone has seen my giveaway posted the other day, but if you haven't entered yet, go do it! Today I have two polishes from indie brand Lac Attack from their Spring Fling collection. It's a new to me brand and I'm always excited to experience new goodies.

First up is Puddle Jumping. Inspired by April showers, gray skies and blue raindrops, it's a medium-light gray creme with tiny indigo flakes and a purple/blue hidden shimmer. I used two coats here. It was easy to apply and buttery. I like this color and it definitely evokes memories of quiet rainy spring days.
Lac Attack - Puddle Jumping

Now using Puddle Jumping as a base, I layered two coats of a glitter topper called Bunny Poop over it to make a fun springy mani. It's made up of yellow, pink, green and blue pastel matte glitter in a clear base. It reminds me of yummy easter candy! I think these two compliment each other naturally and adore this combo.
Lac Attack - Bunny Poop over Lac Attack - Puddle Jumping

You can buy Lac Attack from their website http://www.lacattack.com for $8 in full size and $4.25 in a mini. The company has a bunch of goodies on sale right now, including Bunny Poop! What do you think of these two polishes? Have you ever tried this brand?

Product samples were provided for consideration.
Related Posts Plugin for WordPress, Blogger...